Vue2 源码从零详解系列文章, 还没有看过的同学可能需要看一下之前的,vue.windliang.wang/ (opens new window)
# 场景
import { observe } from "./reactive";
import Watcher from "./watcher";

const data = {
    a: 1,
    b: 2,
    c: 3,
};
observe(data);
const updateComponent = () => {
    console.log(data.a + data.b);
};

new Watcher(updateComponent);

const updateComponent2 = () => {
    console.log(data.c);
};
new Watcher(updateComponent2);

data.a = 2;
data.a = 3;
data.b = 4;

data.c = 5;
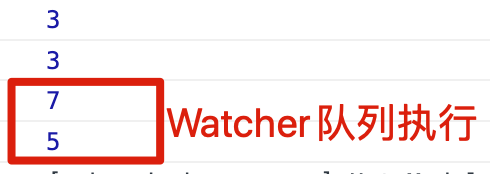
new Watcher(updateComponent) 进行依赖收集会输出一次 3 ,new Watcher(updateComponent2) 进行依赖收集也会输出一次 3 。
之后我们依次改变 a、 a 、b、c 的值,每改变一次就会触发 Watcher 的执行,会连续进行四次的 console.log。
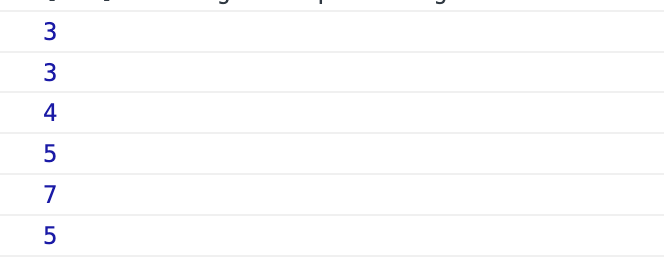
试想一下如果这里的 console.log 是渲染页面,那改变一次值就刷新一下页面,会造成严重的性能问题,页面也会不停的改变。
# 解决方案
我们可以通过一个队列,收集所有的 Watcher 。
那什么时候执行 Watcher 队列呢?
为了等所有的 Watcher 都收集完毕,可以将 Watcher 的执行放到 setTimeout 中。这样当主线程全部执行后,才会去执行 Watcher 队列。
# 代码实现
我们可以给每一个 Watcher 加上一个 id,如果队列中已经有 id 了就不加入队列。
let uid = 0;

export default class Watcher {
    constructor(Fn, options) {
        this.getter = Fn;
        this.depIds = new Set(); // 拥有 has 函数可以判断是否存在某个 id
        this.deps = [];
        this.newDeps = []; // 记录新一次的依赖
        this.newDepIds = new Set();
      	/******新增 *************************/
        this.id = ++uid; // uid for batching
        // options
        if (options) {
            this.sync = !!options.sync;
        }
      	/************************************/
        this.get();
    }
    ...
}
我们同时提供了一个 options 对象,保存了其中的 sync 字段,表示是像之前一样立即出触发 Watcher 还是放到队列中。
然后 Watcher 的 update 方法中我们去调用加入队列的函数。
export default class Watcher {
    ...
    update() {
        if (this.sync) {
            this.run(); // 直接运行
        } else {
            queueWatcher(this); // 加入队列
        }
    }
    ...
}
看一下 queueWatcher 的实现。
const queue = []; // 保存 Watcher 队列
let has = {}; // 去重 Watcher
let waiting = false; // 是否加入到了 setTimeout 队列

export function queueWatcher(watcher) {
    const id = watcher.id;
    if (has[id] == null) {
        has[id] = true;
        queue.push(watcher); // 加入队列
        // queue the flush
        if (!waiting) { // 执行 Watcher 函数放到 setTimeout 队列中,只加入一次即可
            waiting = true;
            setTimeout(flushSchedulerQueue, 0);
        }
    }
}
再看一下上边执行 Watcher 队列的 flushSchedulerQueue 函数的实现。
let flushing = false; // 是否正在执行队列
let index = 0;
/**
 * Flush both queues and run the watchers.
 */
function flushSchedulerQueue() {
    flushing = true;
    let watcher, id;
    for (index = 0; index < queue.length; index++) {
        watcher = queue[index];
        id = watcher.id;
        has[id] = null;
        watcher.run();
    }

    resetSchedulerState(); // 执行结束后进行重置
}

/**
 * Reset the scheduler's state.
 */
function resetSchedulerState() {
    index = queue.length = 0;
    has = {};
    waiting = flushing = false;
}
总体上就是上边的样子了。
# 执行结果
import { observe } from "./reactive";
import Watcher from "./watcher";

const data = {
    a: 1,
    b: 2,
    c: 3,
};
observe(data);
const updateComponent = () => {
    console.log(data.a + data.b);
};

new Watcher(updateComponent);

const updateComponent2 = () => {
    console.log(data.c);
};
new Watcher(updateComponent2);

data.a = 2;
data.a = 3;
data.b = 4;

data.c = 5;
虽然后边我们改变了四次 data 中的值,但事实上只有两个 Watcher ,因此只会输出两次。
# 总
通过异步的一个队列,当所有 Watcher 收集完毕后统一执行,进行了性能方面的优化。
Last Updated: 6/6/2022, 9:53:00 PM