Vue2 源码从零详解系列文章, 还没有看过的同学可能需要看一下之前的,vue.windliang.wang/ (opens new window)
# 前置知识
# dom 更新
首先明确一下 dom 更新的概念。
浏览器中有一个 js 引擎线程执行我们的 js 代码,同时还有一个 GUI 渲染线程来进行绘图,并且两个线程是互斥的,只能交替着进行。
而dom 更新是在 js 线程中进行的,因此 dom 更新了并不代表我们就一定可以看到,只有当渲染线程把更新的 dom 绘制完毕我们才会看到。
简单理解就是下边的样子:
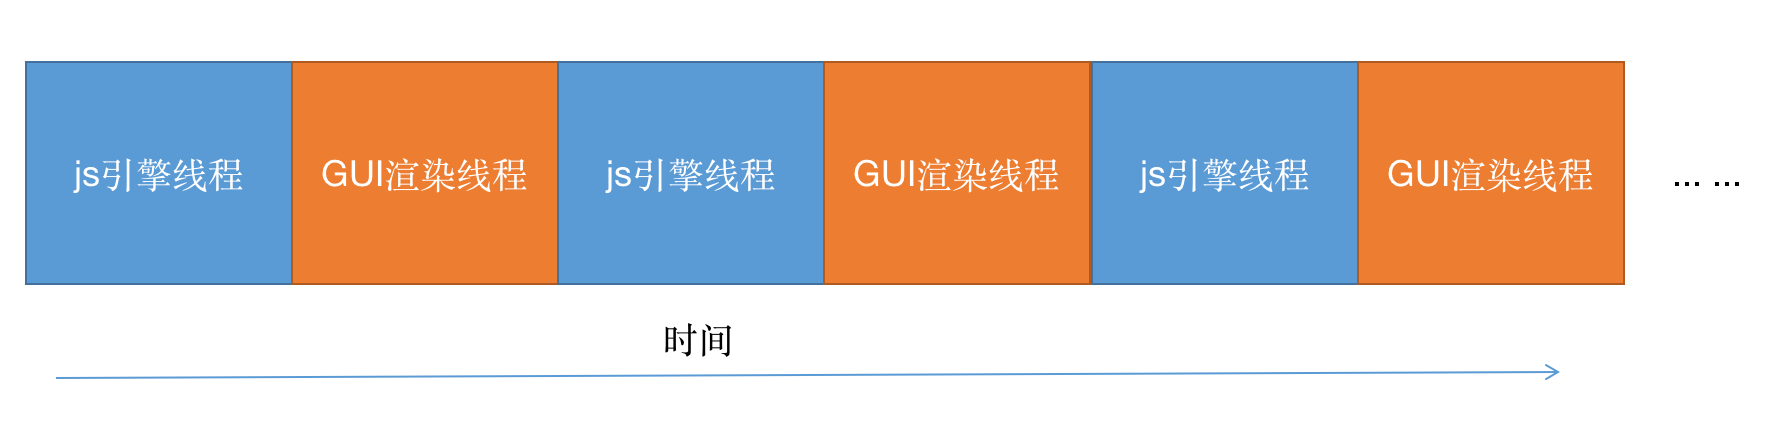
举一个极端的例子,如果我们在 js 线程里修改了 dom ,但某种原因使得 js 线程一直在执行,没有轮到渲染线程,那么我们就永远看不到更新后 dom 了。
html 引入 bundle.js 。
<!DOCTYPE html>
<html lang="en">
    <head>
        <meta charset="UTF-8" />
        <meta http-equiv="X-UA-Compatible" content="IE=edge" />
        <meta name="viewport" content="width=device-width, initial-scale=1.0" />
        <title>Document</title>
    </head>
    <body>
        <div id="root"></div>
        <script src="bundle.js"></script>
    </body>
</html>
bundle.js 首先修改 dom ,然后执行一个死循环。
document.getElementById("root").innerText = "hello";
while (true) {}
此时页面就永远是空白了。但事实上我们的 dom 已经更新了,只是没有轮到渲染线程展示出来。
# 只更新最后一次结果
在 js 线程中如果修改同一个 dom 元素,无论修改多少次,最终轮到渲染线程的时候,渲染线程当前读到的 dom 是啥就会是啥。
document.getElementById("root").innerText = "hello";
document.getElementById("root").innerText = "hello2";
document.getElementById("root").innerText = "hello3";
document.getElementById("root").innerText = "liang";
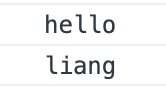
上边 dom 变化了多次,但屏幕上只会看到 liang。
# 宏任务微任务任务队列
这里简单说一下,不细讲了。
- 宏任务生成方式:
script标签,setTimeout,setInterval等 - 微任务生成方式:
Promise,MutationObserver等。
js 线程中,通过 <script> 执行代码,也就是开始执行第一个宏任务,执行过程中新生成的宏任务丢到任务队列,新生成的微任务丢到微任务队列。
当前宏任务执行结束后,开始执行微任务队列,直到微任务队列执行完毕。
js 线程退出来,开始执行渲染线程。
渲染线程执行完毕后,然后又回到 js 线程,去任务队列中取一个宏任务,重复上边的过程。

# 让 dom 更新多次
document.getElementById("root").innerText = "hello";
document.getElementById("root").innerText = "hello2";
document.getElementById("root").innerText = "hello3";
document.getElementById("root").innerText = "liang";
这个例子中渲染的时候只会执行第一次 dom ,但如果我们通过 setTimeout 产生一个宏任务,这样就会看到会先后渲染了。
document.getElementById("root").innerText = "hello";
setTimeout(() => {
    document.getElementById("root").innerText = "hello2";
    setTimeout(() => {
        document.getElementById("root").innerText = "hello3";
        setTimeout(() => {
            document.getElementById("root").innerText = "liang";
        }, 1000);
    }, 1000);
}, 1000);

# 场景
回到我们的响应式系统中。
import { observe } from "./reactive";
import Watcher from "./watcher";

const data = {
    text: "hello",
};
observe(data);
const updateComponent = () => {
    document.getElementById("root").innerText = data.text;
};
new Watcher(updateComponent);
data.text = "liang";
data.text="liang" 触发 Wathcer 更新的时候,并不会立即更新,而是放到 Wathcer 队列中,在 setTimeout 中执行,代码如下。
export function queueWatcher(watcher) {
    const id = watcher.id;
    if (has[id] == null) {
        has[id] = true;
        queue.push(watcher);
        // queue the flush
        if (!waiting) {
            waiting = true;
            setTimeout(flushSchedulerQueue, 0);
        }
    }
}
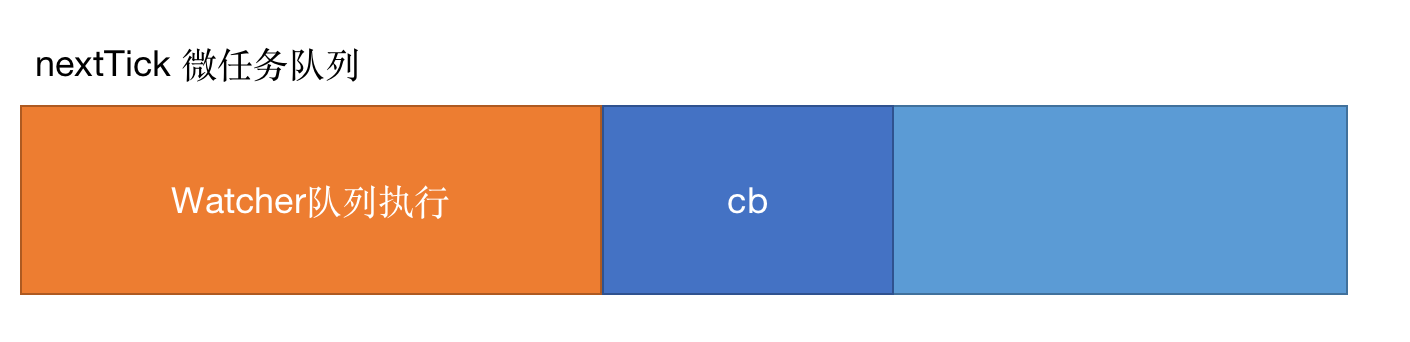
再结合这张图:
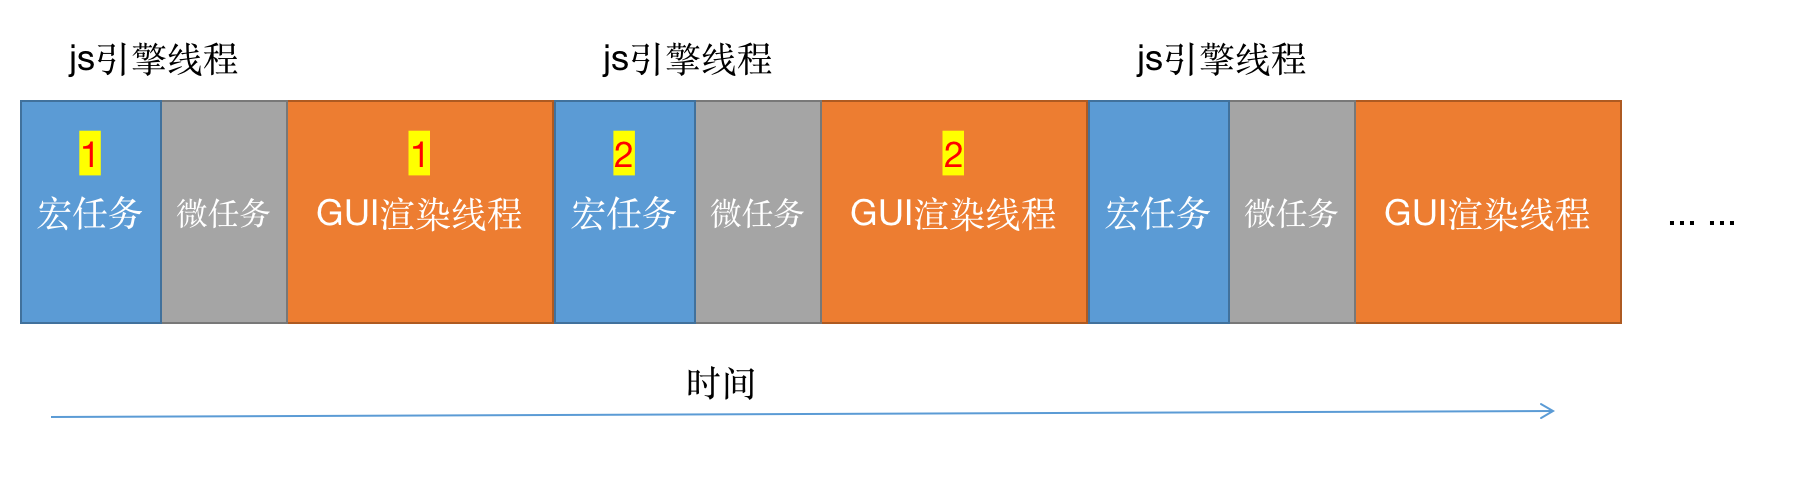
第 1 次宏任务将 dom 更新为 hello ,然后执行第一次的渲染任务。
第 2 次宏任务是将第 1 次宏任务中的 setTimeout 取出进行执行,然后将 dom 更新为 liang ,执行渲染任务。
所以页面应该先是 hello 后是 liang 。
但运行上边的程序发现并不是这样,页面只看到了 liang ,没有看到 hello 。
# 小猜测
没有研究过 Chrome 的代码,这里不负责任的猜想一下,有问题欢迎讨论。
渲染线程不是像上边图中一样每次都接到 js 进程后边,相反渲染线程可以看做在间隔执行,比如每 10ms 执行一次,如果渲染线程准备执行的时候 js 线程还在执行就等待。
但如果第一次宏任务、微任务执行完毕后,时间小于了 10ms ,此时渲染线程还没有准备执行,所以 js 线程就直接去执行第二次宏任务了。
因此,我们可以强行增加第一次宏任务执行的时间,确保 js 线程执行完以后会去执行渲染线程。
import { observe } from "./reactive";
import Watcher from "./watcher";

const data = {
    text: "hello",
};
observe(data);
const updateComponent = () => {
   /****强行增加耗时***********/
    let i = 1000000000;
    while (i) {
        i--;
    }
  /************************************/
    document.getElementById("root").innerText = data.text;
};

new Watcher(updateComponent);
data.text = "liang";
这样的话就符合我们的认知了,首先会渲染出 hello ,然后再渲染出 liang 。
# 验证微任务先执行
为了继续了解下边图中的流程,我们再举个例子。
import { observe } from "./reactive";
import Watcher from "./watcher";

const data = {
    text: "hello",
};
observe(data);
const updateComponent = () => {
    let i = 1000000000;
    while (i) {
        i--;
    }
    document.getElementById("root").innerText = data.text;
};

new Watcher(updateComponent);
data.text = "liang";

const p = Promise.resolve();
p.then(() => {
    document.getElementById("root").innerText = "promise";
});
先 1 分钟思考一下,屏幕会输出什么。
第一次宏任务的时候 dom 被修改成了 hello ,但此时还没有执行渲染线程。
接着执行微任务,将 dom 修改为 promise 。
接着执行第一次渲染线程,页面展示出 promise 。
第二次宏任务执行,将 dom 修改为 liang 。
此时没有微任务。
接着执行第二次渲染线程,页面展示出 liang 。
# 优化
响应式系统之异步队列 (opens new window)文章中介绍的,如下代码:
export function queueWatcher(watcher) {
    const id = watcher.id;
    if (has[id] == null) {
        has[id] = true;
        queue.push(watcher);
        // queue the flush
        if (!waiting) {
            waiting = true;
            setTimeout(flushSchedulerQueue, 0);
        }
    }
}
因为我们是将 Watcher 队列的执行放到了 setTimemout 中,所以在第一次宏任务中把 data 的响应式数据更改后,dom 并不会立即去更新。
这就导致第一次的渲染线程轮空了,到了第二次宏任务的时候才会执行 Watcher 队列来更新 dom ,然后在第二次渲染线程中才会更新为改变后的视图。
最好的做法当然是将 dom 的更新放在第一次渲染线程执行之前,即第一次宏任务后的微任务。
Vue 中提供了 next-tick 供我们使用,下边看一下实现。
# next-tick 实现思路
实现起来其实也很简单,只需要模仿 之前 (opens new window) Watcher 队列的实现。
自身维护一个队列,保存所有的回调函数。然后将队列的执行放到 Promise 中即可。
用 callbacks 数组保存所有的回调函数,提供一个方法执行 callbacks 所有的回调函数。
const callbacks = [];
let pending = false; // 代表是否将 `callbacks` 执行加入到了微任务队列中

function flushCallbacks() {
    pending = false;
    const copies = callbacks.slice(0);
    callbacks.length = 0;
    for (let i = 0; i < copies.length; i++) {
        copies[i]();
    }
}
提供一个函数,将 flushCallbacks 加到微任务队列,为了保证兼容性,如果不支持 Promise 我们依旧使用 setTimeout 。
import { isNative } from "./env";
/*
export function isNative(Ctor) {
    return typeof Ctor === "function" && /native code/.test(Ctor.toString());
}
*/
let timerFunc;

if (typeof Promise !== "undefined" && isNative(Promise)) {
    const p = Promise.resolve();
    timerFunc = () => {
        p.then(flushCallbacks);
    };
} else {
    // Fallback to setTimeout.
    timerFunc = () => {
        setTimeout(flushCallbacks, 0);
    };
}
然后就是 nextTick 的代码了,
export function nextTick (cb?: Function, ctx?: Object) {
  let _resolve
  callbacks.push(() => {
    if (cb) {
        cb.call(ctx)
  })
  if (!pending) {
    pending = true  // 代表是否将 `callbacks` 执行已经加入到了微任务队列中
    timerFunc() // 加入到微任务队列
  }
}
当然,我们还可以支持一下 Promise 风格的调用,也就是支持下边的调用方式。
nextTick().then(() => {})
实现起来也比较简单,我们只需要判断没有 cb 的时候,生成一个 Promise ,然后将 resolve 的执行放到 callbacks 数组中。
export function nextTick(cb, ctx) {
    let _resolve;
    callbacks.push(() => {
        if (cb) {
            cb.call(ctx);
        } else if (_resolve) {
            _resolve(ctx); // 支持 Promise 风格调用,当执行到这里,就会执行用户的回调函数了
        }
    });
    if (!pending) {
        pending = true;
        timerFunc(); // 只执行一次
    }

    if (!cb && typeof Promise !== "undefined") {
        return new Promise((resolve) => {
            _resolve = resolve; // 保存当前 resolve
        });
    }
}
# 优化异步队列
执行 Watcher 队列的更新我们就不使用了 setTimeout 了,直接使用 next-tick 即可。
export function queueWatcher(watcher) {
    const id = watcher.id;
    if (has[id] == null) {
        has[id] = true;
        queue.push(watcher);
        // queue the flush
        if (!waiting) {
            waiting = true;
           //  setTimeout(flushSchedulerQueue, 0); // 修改前
          /******修改 *************************/
            nextTick(flushSchedulerQueue);
           /************************************/
        }
    }
}
回到最开始的代码中。
import { observe } from "./reactive";
import Watcher from "./watcher";

const data = {
    text: "hello",
};
observe(data);
const updateComponent = () => {
    let i = 1000000000;
    while (i) {
        i--;
    }
    document.getElementById("root").innerText = data.text;
};

new Watcher(updateComponent);
data.text = "liang";
此时页面就先展示初始值 hello 再展示直接 liang 了,会直接展示 liang ,原因的话还是下边这张图。
我们在第一次微任务的时候将 dom 更新为了 liang ,到了第一次渲染线程当然就会渲染出 liang 了。
# nextTick 用法
import { observe } from "./reactive";
import Watcher from "./watcher";
import { nextTick } from "./next-tick";
const data = {
    text: "hello",
};
observe(data);
const updateComponent = () => {
    let i = 1000000000;
    while (i) {
        i--;
    }
    document.getElementById("root").innerText = data.text;
};

new Watcher(updateComponent);

const updateData = () => {
    data.text = "liang";
    console.log(document.getElementById("root").innerText);
    const cb = () => {
        console.log(document.getElementById("root").innerText);
    };
    nextTick(cb);
};

updateData();
有两次输出,1 分钟思考一下两次输出分别是什么。
... ...
updateData 函数中,当我们把 data.text 赋值为 liang 的时候,虽然触发了 Wacher,但此时并不会执行,而是将 Watcher 收集到 Watcher 队列中。
所以第一次输出的还是更新前的 dom ,也就是 hello 。
接下来 nextTick 会将回调函数加到微任务队列中。
当我们执行 cb 的时候,Watcher 队列已经执行完毕,所以此刻 dom 已经更新了,输出的自然是 liang 了。
另外,因为 nextTick 还支持 Promise 调用,所以还有一种骚操作。
import { observe } from "./reactive";
import Watcher from "./watcher";
import { nextTick } from "./next-tick";
const data = {
    text: "hello",
};
observe(data);
const updateComponent = () => {
    let i = 1000000000;
    while (i) {
        i--;
    }
    document.getElementById("root").innerText = data.text;
};

new Watcher(updateComponent);

const updateData = async () => {
    data.text = "liang";
    console.log(document.getElementById("root").innerText);
    await nextTick();
    console.log(document.getElementById("root").innerText);
};

updateData();
直接将 nextTick() 进行 await ,然后再输出,效果的话和上边是一样的。
# 总
主要讲解了 nextTick 的原理,将 Watcher 的更新放到了微任务中,防止第一次渲染线程浪费掉。
平常 Vue 开发中,我们如果想要拿到更新后的 dom 值,就需要使用 nextTick 了,当然此刻只是 dom 更新了,页面还没有渲染。
留一个问题,如果在 nextTick 再改变响应式数据 data 中的值,那么是先渲染之前的值再渲染改变后的值,还是只渲染一次改变后的值,思考过后相信会对 nextTick 有更深刻的理解。